Vivado Board Files
We currently offer board files for the following Opal Kelly boards. Device specific information is located in their Vivado Board File sections:
How-To Install
Vivado v2021.1 and Later
Our Vivado Board File catalog is integrated into Vivado versions 2021.1 and later. We only maintain these Vivado version branches at Xilinx’s Board Store Repository.
- Add device support for the FPGA Architecture on the target Opal Kelly board through Help->Add Design Tools or Devices
- Create a new project
- Click Next until the Default Part menu
- Select the Boards tab
- Fetch the latest available boards/versions from Xilinx’s Board Store GitHub repository by clicking the Refresh button
- Use the Vendor filter and select opalkelly.com
- Install the target Opal Kelly board file by clicking the install icon in the Status column
- Select the target Opal Kelly board file for use in the new project
Before Vivado v2021.1
Our Vivado Board File won’t be available in the Boards tab when creating a new project using Vivado versions earlier than 2021.1.
- Add device support for the Architecture on the target Opal Kelly board through Help->Add Design Tools or Devices
- Checkout the master branch at Xilinx’s Board Store Repository
- In Vivado, add boards/OpalKelly to Tools->Settings->Vivado Store->Board Repository
- Create a new project
- Click Next until the Default Part menu
- Select the Boards tab
- Select the target Opal Kelly board file for use in the new project
How-To Apply DDR MIG Vivado IP Core Configuration
We maintain MIG Vivado IP Core configurations within our Board Files for all USB3 boards at Xilinx’s Board Store for Vivado versions v2021.1 and later. Configuring your project to use a Board File allows it access to this Vivado version specific MIG configuration data.
The configuration data in the board files will set up the MIG Vivado IP Core to operate with the AXI Interface. However, if you want to use the Native Interface instead, you’ll need to make this change in the configuration wizard after applying the board file configuration.
Follow the steps below to generate the Xilinx MIG IP using your Opal Kelly board’s Board File:
Create Toolbar Command
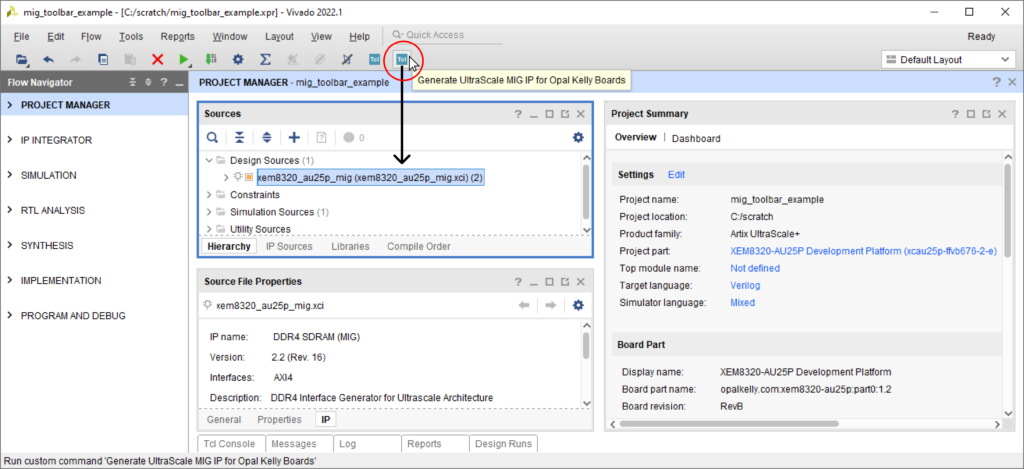
To create the toolbar command, execute into the TCL console the command for your board’s architecture:
7 Series (XEM73xx)
create_gui_custom_command -name genOK7SeriesMIG -menu_name {Generate 7-Series MIG IP for Opal Kelly Boards} -show_on_toolbar -command {\
set board_name [lindex [split [get_property BOARD_NAME [current_board]] "_"] 0]
set ip_name [regsub -all -- "-" [set board_name] "_"]_mig
create_ip -name mig_7series -vendor xilinx.com -library ip -module_name $ip_name
set_property -dict [list CONFIG.XML_INPUT_FILE [glob -dir [file dirname [get_property FILE_NAME [get_boards *:$board_name:*]]] *.prj]] [get_ips $ip_name]\
}
Code language: PHP (php)
UltraScale and UltraScale+ (XEM83xx)
create_gui_custom_command -name genOKUltraScaleMIG -menu_name {Generate UltraScale MIG IP for Opal Kelly Boards} -show_on_toolbar -command {\
set ip_name [regsub -all -- "-" [lindex [split [get_property BOARD_NAME [current_board]] "_"] 0] "_"]_mig
create_ip -name ddr4 -vendor xilinx.com -library ip -module_name $ip_name
set_property -dict [list CONFIG.C0_DDR4_BOARD_INTERFACE [get_board_component_interfaces ddr*]] [get_ips $ip_name]\
}
Code language: PHP (php)
Remove Toolbar Command
To remove the toolbar commands mentioned above, you can take either of the following actions:
- In the Vivado graphical user interface (GUI), navigate to Tools > Custom Commands > Customize Commands > Remove.
- Run the command that corresponds to the toolbar command installed on your system:
remove_gui_custom_commands genOK7SeriesMIGremove_gui_custom_commands genOKUltraScaleMIG
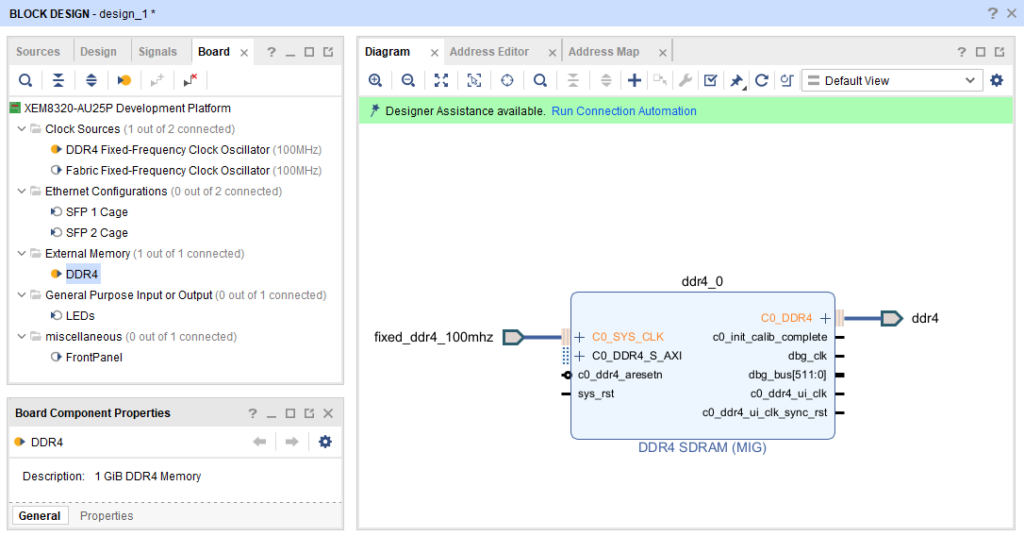
IP Integrator (IPI) Project Mode
The MIGs configuration settings are applied automatically when you instantiate the DDR board component.
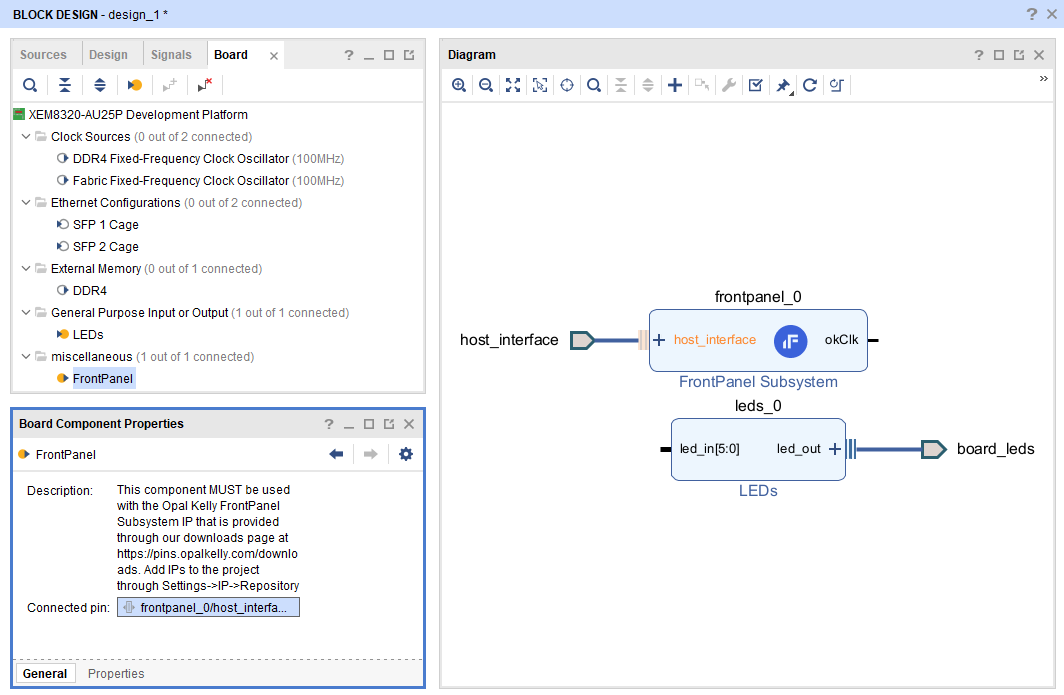
FrontPanel and LEDs Components
On FrontPanel enabled Opal Kelly boards, FrontPanel and LED board components are available in the IPI Block Designer. These components require IP Cores provided in our Vivado IP Cores’ Distribution. Follow instructions at Add IP Cores’ Distribution to Vivado to install these IP Cores:
SYZYGY Companion Cards
Install available SYZYGY Companion Cards following the same instructions described in section How-To Install above. We provide the following SYZYGY Companion Cards, device specific information is located in their Vivado Board File sections:
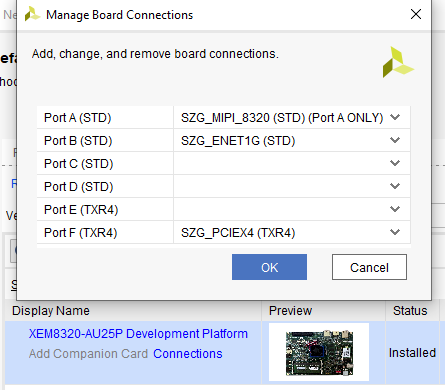
To add a SYZYGY Companion Card select Connections in the board selection menu and add the appropriate SYZYGY peripherals to the intended port. The SYZYGY peripherals will support one of the SYZYGY port types (STD, TXR2, TXR4). Connect the companion card to the correct SYZYGY port type on the SYZYGY carrier board. See below for an example of this:
Board & Companion Card Compatibility
The following Opal Kelly board files are compatible with SYZYGY Companion Cards, see their Supported SYZYGY Companion Cards sections for their compatible SYZYGY Companion Cards:
Restrictions/Notes
The SYZYGY Ports do not constrain the IOSTANDARD for the pins. This is done because VIO, which powers the bank, will change based on the SYZYGY peripheral attached or through setting it manually. Constrain the IOSTANDARD through the top level .xdc constraints file or through the GUI to incorporate it into the timing analysis.