Example: Camera

The Camera example design is an open-source image capture reference pairing AMD Video IP gateware with a host application that auto-detects its hardware. It delivers live streaming, single-frame capture, a hardware-accelerated ISP pipeline (bad pixel correction, demosaicing, auto white balance, gain control), a real-time RGB histogram, and a hardware test pattern generator. It supports multiple FPGA board and camera sensor combinations, and runs without a camera attached by falling back to the built-in test pattern generator, providing a foundation for building machine vision applications on Opal Kelly FPGAs.
The same gateware can be driven by two interchangeable host applications. Choose based on whether you want the richest UI or the fastest path to the hardware:
- FrontPanel Platform App (TypeScript): the richest, most feature-complete UI, including client-side YOLO object detection (TensorFlow.js). Run it through the FrontPanel Platform Application Launcher, or launch it directly as a standalone app you can deploy without the Launcher (for shipping to your own users). It reaches the hardware through the Platform’s JavaScript layers, which add some round-trip latency to each call.
- okCameraApp (C++): a native desktop application for Windows, Linux, and macOS, available pre-built or buildable from source. With a more direct path to the device, it sustains a higher rate of calls per second, so it is the better choice when performance matters.

Either app drives a board attached to your own computer over USB. Over FrontPanel-over-IP, okCameraApp can also reach a board on a different computer, with the same support coming to the FrontPanel Platform app.
Both applications share the same capture pipeline, camera controls, and board-abstraction model (see Software Architecture Reference); they differ only in their user-interface layer.
Supported Configurations
| Board / SYZYGY Peripheral | Camera Module | Sensor / Interface | Resolution |
|---|---|---|---|
| XEM8320-AU25P | |||
| SZG-Camera | Integrated | AR0330, HiSPi (4-lane) | up to 2304×1296 |
| SZG-MIPI-8320 | Pcam 5C on CAMERA 1 | OV5640, MIPI CSI-2 (2-lane) | up to 1920×1080 |
| No SYZYGY Peripheral | None | Built-in hardware TPG | up to 1920×1080 |
| SZG-HUB1450-AU10P | |||
| SZG-Camera | Integrated | AR0330, HiSPi (4-lane) | up to 2304×1296 |
| SZG-MIPI-8320 | Pcam 5C on CAMERA 1 | OV5640, MIPI CSI-2 (2-lane) | up to 1920×1080 |
| No SYZYGY Peripheral | None | Built-in hardware TPG | up to 1920×1080 |
Resources
Host Boards
SYZYGY Peripherals
- SZG-Camera
- SZG-MIPI-8320 Pcam 5C (connects via CAMERA 1)
Links
Getting Started: FrontPanel Platform App (TypeScript)
The FrontPanel Platform app is installed through the FrontPanel Platform Application Launcher, the most feature-rich way to use the example, including client-side YOLO object detection.
You’ll need:
- A supported Board / SYZYGY Peripheral combination (see Supported Configurations), or any supported host board alone for TPG-only mode
- FrontPanel Platform 6.1.0 or newer installed (see the FrontPanel Platform Getting Started guide). The app declares this as its minimum platform version, so the Launcher will refuse to install it on an older Platform.
Camera.fppfrom the latest Camera Example Design release
Running the App
- Connect the SYZYGY Peripheral to SYZYGY Port A on the host board, connect the board to the PC via USB, and power on. For TPG-only mode, no peripheral is needed.
- Install the
Camera.fppin the Application Launcher. - Drag the Camera app card onto the device card.
Building the TypeScript Source
Requirements
- Node.js 20 or newer, and the same development prerequisites as any FrontPanel Platform app (see the Building with NPM Create guide)
- The latest Camera Example Design release source
Build steps (from the Software/FP-Platform/ folder in the release):
npm install
npm run pack
The packaged .fpp is written to Software/FP-Platform/output/Camera.fpp. Pre-built bitfiles for all supported configurations ship with the repository, so you do not need to rebuild the gateware first.
Getting Started: okCameraApp (C++)
okCameraApp is a native desktop build of the same example for Windows, Linux, and macOS. It is available pre-built (just download and run) or you can build it from source.

You’ll need:
- A supported Board / SYZYGY Peripheral combination (see Supported Configurations), or any supported host board alone for TPG-only mode
- FrontPanel Platform 6.1.0 or newer, installed from the Opal Kelly downloads page (this requires a registered Pins account). It provides the USB driver. The FrontPanel SDK provides the runtime library and headers; it ships inside the Platform installer and is unpacked from within the application (see below). You need the SDK to build from source on any platform, and to run the pre-built app on Windows and Linux. The pre-built macOS app is self-contained (the runtime is bundled inside), so it needs no separate install. The FPGA bitfiles are handled for you in every case. So is wxWidgets in the pre-built downloads and in the Windows source build, where
setup-wxwidgets.ps1fetches it. On a Linux or macOS source build you install wxWidgets yourself, using the command in your OS’s section below. - The application itself: either a pre-built download (a
Camera-Cpp-<platform>archive from the latest release) or the source (underSoftware/Cxx/in the repository) to build yourself
Running the Pre-built Application
First connect the SYZYGY Peripheral to SYZYGY Port A on the host board, connect the board via USB, and power on. For TPG-only mode, no peripheral is needed. Then download the build for your platform from the release:
| Platform | Download |
|---|---|
| Windows | Camera-Cpp-Win-x64.zip |
| Linux | Camera-Cpp-Ubuntu-24.04LTS-x64.tgz |
| macOS | Camera-Cpp-Mac-arm64.dmg |
The FPGA bitfiles and the wxWidgets runtime are bundled inside every build, so you never install those yourself.
macOS
The macOS build is self-contained: the FrontPanel runtime is bundled inside the app, so there is nothing to install or copy.
- Open
Camera-Cpp-Mac-arm64.dmgand drag okCameraApp to Applications. - Launch okCameraApp from Applications. On first launch macOS shows a one-time confirmation that the app was downloaded from the Internet. Because the build is signed and notarized by Opal Kelly, the dialog also reports that Apple checked it and found no malicious software. Click Open.
The macOS build targets Apple Silicon (arm64); on an Intel Mac, build from source instead.
Windows and Linux
These builds need two things from Opal Kelly: FrontPanel Platform, which installs the USB driver, and the FrontPanel SDK, which contains the runtime library.
- Install FrontPanel Platform, then open it and export the FrontPanel SDK.
- Extract the okCameraApp archive.
- Put the FrontPanel shared library on okCameraApp’s search path (see below).
- Run the application from the extracted folder (on Linux,
./okCameraApp).
Put the FrontPanel shared library on okCameraApp’s search path. okCameraApp loads the FrontPanel shared library at startup (okFrontPanel.dll on Windows, libokFrontPanel.so on Linux), and finds it either in the same folder as the okCameraApp executable or on the system library search path.
The library is part of the FrontPanel SDK, which ships inside the FrontPanel Platform installer rather than as a separate download. However, it is not unpacked when you install. To get it, open FrontPanel Platform, use its action to export the SDK, and choose where to unpack it. It extracts to a single folder named for the SDK version, e.g. FrontPanel-DevKit-6.1.0, and the library is in that folder’s API/ directory. So either:
- copy it into the same folder as the
okCameraAppexecutable, or - add the FrontPanel SDK’s
API/folder to the system library search path (PATHon Windows,LD_LIBRARY_PATHon Linux).
Copying the library next to the executable works on both platforms: Windows searches the executable’s folder by default, and the Linux build carries an $ORIGIN RPATH. On Linux, copy both libokFrontPanel.so and libokFrontPanel.so.2; the second name is the one the loader resolves.
If you skip this step the application does not start and, on Windows, may exit without any message at all. For FrontPanel-over-IP, add the plugin from the same API/ folder (okimpl_fpoip.dll on Windows, okimpl_fpoip.so on Linux). Note there is no lib prefix on Linux: the runtime loads the plugin by the bare name okimpl_fpoip. See the FrontPanel DLL documentation to learn more.
These steps connect okCameraApp to a board attached to this computer over USB. To use a board attached to a different computer, see Using a Remote Device (FrontPanel-over-IP).
Building from Source
You supply three things: the FrontPanel SDK, a C++ toolchain, and wxWidgets (the commands are in your OS’s section below). The build stages the FPGA bitfiles into the run folder (inside Contents/Resources in the macOS .app), so every build produces a tree that runs in place.
Get the FrontPanel SDK
The SDK ships inside the FrontPanel Platform installer rather than as a separate download, and it is not unpacked when you install. Open FrontPanel Platform, use its action to export the SDK, and choose where to unpack it. It extracts to a single folder named for the version, e.g. FrontPanel-DevKit-6.1.0, with the headers and libraries in that folder’s API/ directory.
Export the SDK for the operating system you are building on. The export is platform-specific: a Windows export contains okFrontPanel.dll and okFrontPanel.lib, a Linux one contains libokFrontPanel.so, a macOS one libokFrontPanel.dylib. Copying a Windows SDK to a Linux build machine does not work, and the failure is confusing rather than obvious: the headers are found and the library is not.
Set OKFP_SDK
It must point at the API directory of the SDK you just exported. This is required on every platform, not only when the SDK is somewhere unusual: you choose where it is unpacked, so the build has no reliable default to fall back on.
| For this terminal | Persistently, so new terminals and IDEs inherit it | |
|---|---|---|
| Windows (PowerShell) | $env:OKFP_SDK = "C:\path\to\FrontPanel-DevKit-6.1.0\API" | setx OKFP_SDK "C:\path\to\FrontPanel-DevKit-6.1.0\API" then reopen the terminal |
| Windows (Command Prompt) | set OKFP_SDK=C:\path\to\FrontPanel-DevKit-6.1.0\API | as above |
| Linux / macOS | export OKFP_SDK=/path/to/FrontPanel-DevKit-6.1.0/API | add that same export line to ~/.profile (or ~/.zprofile on macOS), then open a new terminal |
export on its own lasts only for the current terminal. If you build from an IDE launched from the Start menu, the Dock or a desktop launcher, it inherits the environment from the desktop session and not from your terminal, so use the persistent form and restart the IDE.
The shell matters on Windows: set is Command Prompt syntax. In PowerShell (the default in Windows Terminal, VS Code and most IDE terminals), set silently does something else and the variable never reaches CMake.
If the build cannot find the SDK
Both causes report FrontPanel-Platform SDK not found, and the two lines beneath it tell you which one you have.
The variable did not reach CMake. OKFP_SDK shows a path you did not set, and both OKFP_INCLUDE_DIR and OKFP_LIBRARY are NOTFOUND. Those defaults are C:/Program Files/Opal Kelly/FrontPanel-Platform/API on Windows, /opt/Opal Kelly/FrontPanel-Platform/API on Linux, and /Applications/FrontPanel-Platform/API on macOS; none of them normally exists. Use the persistent form above, and restart the IDE if you are building from one.
The SDK is for the wrong operating system. OKFP_SDK shows exactly the path you set and OKFP_INCLUDE_DIR resolves, but OKFP_LIBRARY is NOTFOUND. The headers are the same on every platform; the library is not. Export the SDK again for the OS you are building on.
If a configure has already failed once, OKFP_SDK is cached in the build tree and a corrected value is ignored. Re-run with --fresh (cmake --workflow --preset release --fresh) or delete the build directory first.
The steps below build with the bundled release preset, which needs CMake 3.25 or newer. With older CMake, configure and build manually instead: cmake -S . -B build -DBUILD_GUI=ON then cmake --build build --config Release.
Windows
- Install FrontPanel Platform and export the Windows FrontPanel SDK from inside it (see above), then Visual Studio 2022 (Desktop development with C++) and CMake. The CMake installer does not add itself to
PATHby default, so tick that option. Then, fromSoftware/Cxx/, fetch wxWidgets:
powershell -ExecutionPolicy Bypass -File scripts\setup-wxwidgets.ps1Code language: CSS (css)This downloads the prebuilt wxWidgets from the wxWidgets project’s GitHub releases and extracts it into third_party/wxwidgets; nothing is installed system-wide. The -ExecutionPolicy Bypass applies only to this one command so PowerShell will run the local script, and does not change your system policy.
Already have wxWidgets, or no access to GitHub? Skip the script and point the build at your own copy instead. The simplest way is to set WXWIN to its root, and from an IDE it is the only way, because the IDE drives the preset and there is nowhere to put a -D option. You can instead pass -DwxWidgets_ROOT_DIR=<path> at configure time, but the one-line cmake --workflow --preset release in step 4 accepts no -D options, so configure and build in two steps:
   cmake --preset release -DwxWidgets_ROOT_DIR=<path>
   cmake --build --preset releaseCode language: HTML, XML (xml)
wxWidgets 3.2 or newer is expected. Note that if WXWIN is already set in your environment it takes precedence over the copy the script fetches, so an unexpected WXWIN will quietly be used instead: check it before running the script. A WXWIN that points at a path which does not exist is not reported either; the build silently falls back to the copy in third_party/wxwidgets and succeeds, so it can look as though your own copy was used when it was not.
- Set
OKFP_SDKto theAPIdirectory of the extracted FrontPanel SDK, as described above. This is required, and it is the most common reason a first build fails. - Unpack the source somewhere short, with no spaces in the path. Deep paths can exceed the Windows path limit; the resulting error reports that the C++ compiler cannot compile a simple program, which points at the toolchain rather than the real cause.
- From
Software/Cxx/, build with the release preset:
cmake --workflow --preset release- Run
build\gui\Release\okCameraApp.exe.
Linux (Ubuntu 24.04+)
- Install FrontPanel Platform and export the Linux FrontPanel SDK from inside it (see above); then the toolchain and wxWidgets:
sudo apt install build-essential cmake libwxgtk3.2-dev libudev-devCode language: CSS (css)wxWidgets 3.2 and 3.3 are both supported. If your distribution packages it under a different name, or you already maintain your own build, pass -DwxWidgets_ROOT_DIR=<path> when you configure instead.
- Set
OKFP_SDKto theAPIdirectory of the extracted FrontPanel SDK, as described above. This is required, and it is the most common reason a first build fails. - From
Software/Cxx/, build with the release preset:
cmake --workflow --preset release- Run
./build/gui/okCameraApp.
macOS
- Install FrontPanel Platform, export the macOS FrontPanel SDK from inside it (see above), and install the Xcode command-line tools (
xcode-select --install, which exits with an error if they are already present; that is fine); then, using Homebrew, CMake and wxWidgets:
brew install cmake wxwidgetswxWidgets 3.2 and 3.3 are both supported, so whichever version Homebrew installs is fine.
- Set
OKFP_SDKto theAPIdirectory of the exported FrontPanel SDK, as described above. This is required, and it is the most common reason a first build fails. - From
Software/Cxx/, build with the release preset:
cmake --workflow --preset release- Run
open build/gui/okCameraApp.app.
Unlike the pre-built download, an app you build yourself links the wxWidgets you installed with Homebrew rather than bundling it, so it runs on the machine that built it but is not portable to a Mac without those libraries.
Open in an IDE
You can also open the Software/Cxx folder directly in an IDE, which reads CMakePresets.json for you. On Windows, use Visual Studio (File > Open > Folder); on any OS, Visual Studio Code (with the CMake Tools extension), CLion, or Qt Creator. Pick the release preset and build.
Do the setup before you open the folder: complete your OS’s wxWidgets step and set OKFP_SDK using the persistent form above. An IDE inherits the environment from the desktop session rather than from a terminal, so a value set in a terminal does not reach it and the configure step fails.
Bitfiles when building
The application looks for FPGA bitfiles in a Bitfiles/ folder in its resource directory: next to the executable on Windows and Linux, and inside Contents/Resources/ in the macOS .app. The build stages them for you. If you build your own gateware and want to point the application at custom bitfiles, set the OKCAM_BITFILES environment variable to the directory that contains the per-board <Board>/camera_*.bit files.
Using a Remote Device (FrontPanel-over-IP)
FrontPanel-over-IP is rolling out across the host apps and supported devices. Where it stands today:
| Category | Item | FPoIP |
|---|---|---|
| Host app | okCameraApp (C++) | Available now |
| Host app | FrontPanel Platform app | Coming soon |
| Device | XEM8320 | Available now |
| Device | SZG-HUB1450 (native-AXI) | Coming soon |
By default, the host application uses a board connected to your computer over USB. With FrontPanel-over-IP (FPoIP) it can instead use a board attached to a different computer: the application runs on your workstation while the board lives on a remote host (a lab machine, a Raspberry Pi, and so on). The remote host runs a small FPoIP server, and the application connects to it over the network.
Setup has two sides: the host (the computer the board is plugged into) and the client (the host application, today okCameraApp). The walkthrough below uses okCameraApp for the client steps.
On the host: start the FPoIP server
The FPoIP server, its tools, and a sample certificate live in the FPoIP folder of the FrontPanel SDK, which you export from inside FrontPanel Platform as described in Get the FrontPanel SDK. It is not a separate download. Connections are TLS-encrypted, so the server needs a certificate, a key, and a password file; the SDK includes samples to get you started.
- On the host, install FrontPanel Platform for the USB driver, export the FrontPanel SDK from inside it, and connect the board over USB. Export the SDK for the host’s operating system, not your workstation’s: the SDK is platform-specific, and the server runs on the host.
- From the root of the extracted SDK folder, start the server with the sample certificate and password file:
FPoIP/fpoip-server --tlscert=FPoIP/certs/snakeoil.crt --tlskey=FPoIP/certs/snakeoil.key --password=FPoIP/example.passwdOn Windows the binary is FPoIP\fpoip-server.exe. It is not on your PATH; run it by that relative path.
It listens on port 9999 and serves the boards attached to the host. The sample password file provides the credentials username User, password Test.
The server is an interactive console: it reads commands from the terminal, l to list devices and q to quit, so keep a terminal attached to it for as long as you need it running. If its standard input is closed or redirected, as it is when the server is backgrounded, started under a service manager, or launched over SSH without a terminal allocated, it prints Unrecognized command "" followed by FPOIP server stopped. and exits at once without serving anything.
For your own credentials and a properly signed certificate, see the FrontPanel-over-IP documentation, which covers the fpoip-passwd tool and certificate creation.
In okCameraApp: connect to the server
FPoIP uses the FrontPanel plugin okimpl_fpoip. The macOS app bundles it inside, and a from-source build stages it next to the executable, so nothing extra is needed there. For the pre-built Windows and Linux downloads, add okimpl_fpoip from the SDK next to okCameraApp (or keep it on the system library path), the same way as the FrontPanel runtime above. If the plugin is missing, the application exits immediately with no output at all, no error message, and an exit code of 127.
- Launch
okCameraApp. - Click FrontPanel-over-IP….
- In the Connect via FrontPanel-over-IP dialog, enter:
- Host: the host computer’s name or IP address (use
localhostif the server is running on this same machine) - Port:
9999 - Username / Password:
User/Test(or your own credentials)
- Connect. The remote board appears in the device list; select it and use the app exactly as you would a local one: live preview, single capture, the histogram, and the image settings all work over the network. (The button changes to Back to Local USB to switch back.)
Over FPoIP, the camera’s bring-up and capture run as a server-side script next to the board, so only finished frames cross the network. Throughput is still lower than a direct USB connection, so expect a lower frame rate than local use.
Concretely, the capture loop runs as a Lua script (camera_axi.lua) on the server, over its USB link to the board: a capture is a trigger, a poll until the frame is ready, and a read-back, so the many small register operations stay local and never become network round-trips. Only finished frames travel over the network to your GUI app.

FrontPanel-over-IP performance
FrontPanel-over-IP streams full, uncompressed video across the network, so the
frame rate depends on the connection between the client and host. A faster,
lower-latency link and a lower capture resolution both improve frames per second
and latency.
Software Architecture Reference

Layers. At the top is the UI layer, present only in the two host applications. The FrontPanel Platform app presents a React UI (App, CameraView, and the child views for frame, histogram, FPS, and settings); okCameraApp presents an equivalent native wxWidgets UI (the camera window, RGB viewport, histogram panel, and settings sidebar); the Lua server-side script has no UI. Below it, all three implementations share the same orchestration layer that runs the capture lifecycle: CapturePipelineSequencer and the three camera controls (SYZYGYCameraControl, PCAMCameraControl, TPGCameraControl). Client-side object detection (YoloDetector, via TensorFlow.js) is exclusive to the FrontPanel Platform app. Next comes a shared IP driver layer of thin register wrappers for each pipeline block: ISPDriver, VideoDMADriver, TPGDriver, HistogramDriver, StreamSwitchDriver, I2CController. These drive the hardware through the AXI abstraction (IAxiLite and IAxiStream), which sits on the FrontPanel Platform API at the bottom: the JavaScript Platform API for the Platform app, the FrontPanel Platform C++ SDK for okCameraApp, and the FrontPanel server-side scripting API for the Lua script.
AXI Interface. IAxiLite and IAxiStream are the seam where everything above becomes board-agnostic. They are implemented twice: once as a thin wrapper over the Platform API’s native AXI data port (HUB1450), and once as a polling bridge over the Classic data port (XEM8320). Every driver, sequencer, and view is written against the interfaces. At startup, the app detects the board and wires up the matching pair. Nothing else in the code has to know which board it’s running on.
How to Build the Gateware
Requirements
- Vivado with Vitis HLS
- FrontPanel Vivado IP Core (for XEM8320-AU25P) or FrontPanel SDK (for SZG-HUB1450-AU10P)
- The latest Camera Example Design release source
Build steps
Each supported configuration has its own gateware folder under Gateware/<Board>/<Peripheral>/. From that folder:
- Generate the HLS IP cores (
HLS/histogram/, plusHLS/ISP/if a camera peripheral is included). - Run
project.tclin the Vivado TCL console. - Generate the bitstream.
See the README in that folder for the exact commands.
Gateware Architecture Reference
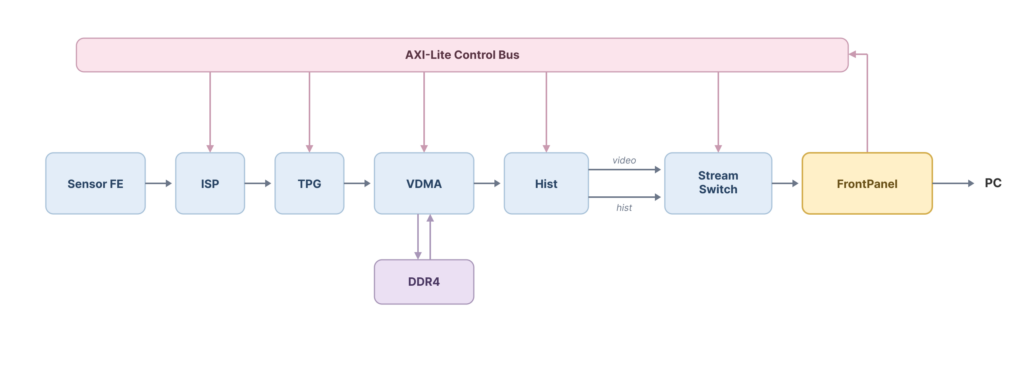
The camera gateware data path: from the sensor front-end through the ISP, VDMA, and histogram out to FrontPanel.
Data path. A frame enters at the sensor front-end: a HiSPi deserializer for SZG-Camera or a MIPI CSI-2 RX subsystem for SZG-MIPI-8320. Without a peripheral, there is no front-end and the TPG sources the pipeline directly. In camera configurations the frame passes through the ISP (a Vitis Vision HLS core handling bad pixel correction, gain, demosaicing, and auto white balance) and then the TPG as a passthrough. The VDMA writes the frame into triple-buffered DDR4 and reads it back out to the histogram accelerator, which emits two parallel streams: the passthrough video and a 96-bit histogram. Both feed the stream switch, which picks one, and FrontPanel delivers it to the PC.
Control path. Alongside the video stream, FrontPanel also exposes an AXI-Lite master that drives a control bus to every register-accessible block in the pipeline. On SZG-HUB1450-AU10P, okHost speaks AXI-Lite and AXI-Stream directly. On XEM8320-AU25P, the FrontPanel Vivado IP Core sits behind a small bridge that converts its classic endpoints to AXI.
Release Notes
Release downloads are on GitHub: opalkelly-opensource/Camera Releases. Each release versions the whole Camera Example Design together (the FPGA gateware and both host applications), and the per-release notes group changes by component (gateware, the FrontPanel Platform app, and okCameraApp).
Camera Example Design 1.1
Initial release of okCameraApp (C++), a native desktop application for Windows, Linux, and macOS. It drives the same gateware as the FrontPanel Platform app and shares the same capture pipeline, and it can also work with a remote device over FrontPanel-over-IP.
Changes to the FrontPanel Platform app:
- The exposure control now labels itself for the camera that is attached. On the SZG-Camera (AR0330) it reads Exposure (1/s) and shows shutter speeds as
1/30,1/125and so on. On the SZG-MIPI-8320 (OV5640) the same slider drives the sensor’s auto-exposure luminance target rather than a shutter time, so it reads Brightness (AEC target) and shows that value directly. - The unused sensor test-pattern modes are gone, leaving only the internal test-pattern generator (TPG) patterns.
- The app is built on the FrontPanel Platform API 6.1.0.
- New application icon.
The gateware is unchanged from 1.0.
Camera Example Design 1.0
Initial release: the FrontPanel Platform app (TypeScript) on the AMD Video IP gateware, supporting the XEM8320 and SZG-HUB1450 with the SZG-Camera (AR0330), SZG-MIPI (OV5640), and no-camera (TPG) configurations.
Legacy RTL Version
A previous version of the Camera Example Design was built on custom RTL gateware paired with a C++/wxWidgets desktop application. It supported a broader set of older FPGA modules (XEM3010, XEM6xxx, XEM7xxx) and the EVB1005/EVB1006 camera boards. That version is archived on the archive/rtl branch of the Camera repository and is provided as-is as a community resource. It is not actively maintained.
Note: the archived RTL application and the current
okCameraApp(C++) are different programs. The archived one targets the legacy RTL gateware, whileokCameraApptargets the current FrontPanel Platform gateware described above.