Example: DisplayPort
This design captures a DisplayPort video feed from a PC graphics card and stores the frames to DDR4 memory. Simultaneously, USB3 FrontPanel introduces a second video stream, which is also stored in the DDR4 memory. These frames are later fetched from memory, with the FrontPanel feed overlaid on the DisplayPort feed, and subsequently outputted to a monitor through DisplayPort. To generate the FrontPanel video feed, a Python frontend application captures a specific screen region from the operating system’s GUI.
Building on AMD’s implementation of the DisplayPort protocol, Opal Kelly enhances the user experience with an intuitive Python frontend application. Our updates provide a tangible application and boost system control and monitoring through the integration of FrontPanel into the video setup.
Example Design Description
The example design is intended to exercise the input and output functionality of the SZG-DISPLAYPORT peripheral as well as the FrontPanel SDK in a real (although contrived) design. The design relies on a reference design provided by AMD-Xilinx which is not supported by Opal Kelly.
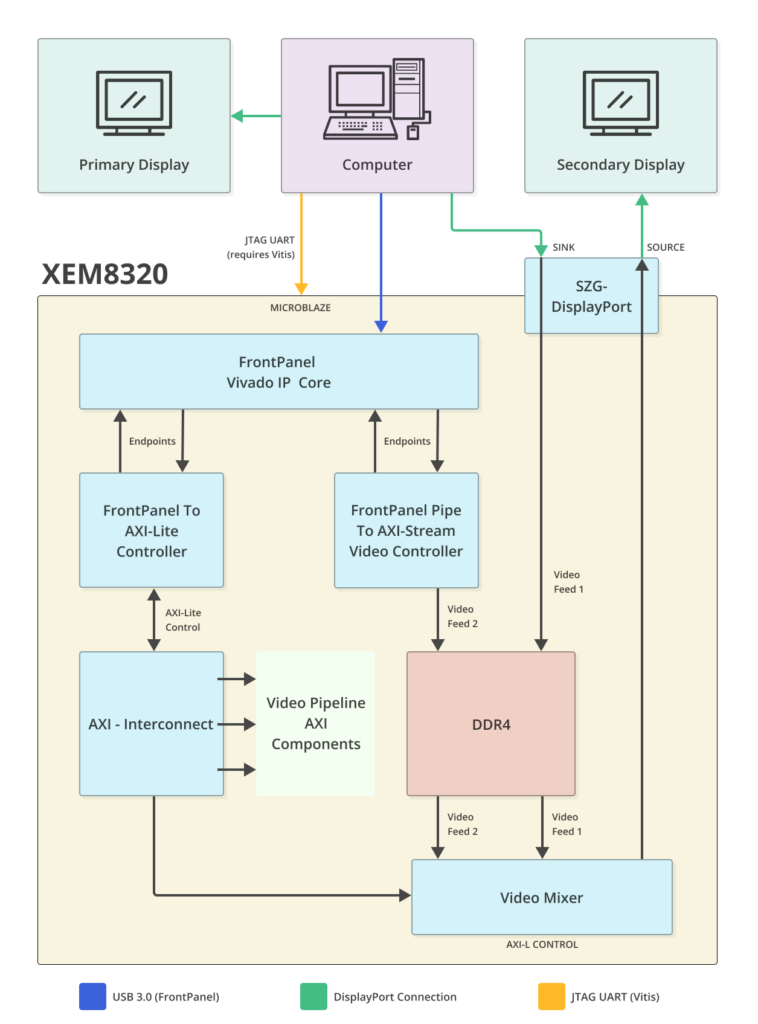
A system block diagram is shown below.
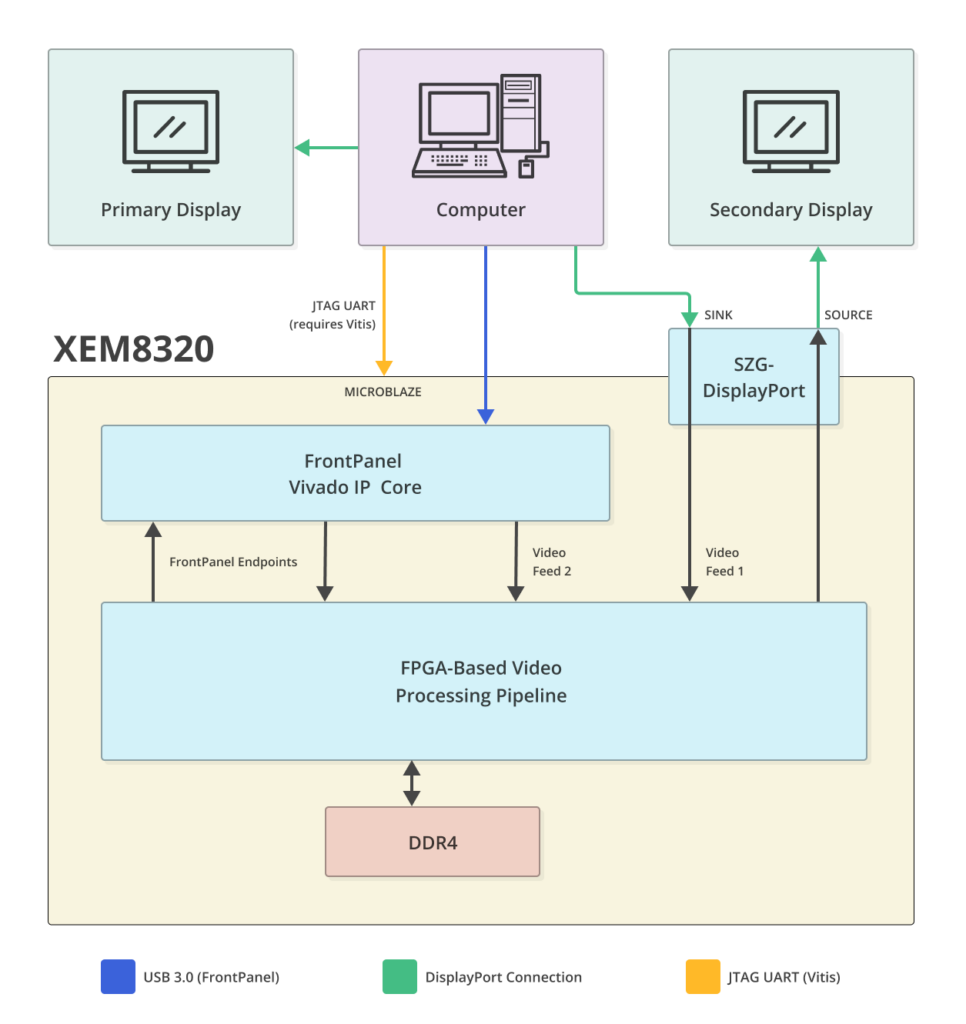
When operational, the XEM8320 and SZG-DISPLAYPORT pass the computer’s secondary display content to the secondary display as if you had connected the computer to the display directly. However, the video pipeline in the FPGA overlays a small image on top of this video. The source of this image is captured by a Python application from a defined region of interest (ROI) on the primary display.
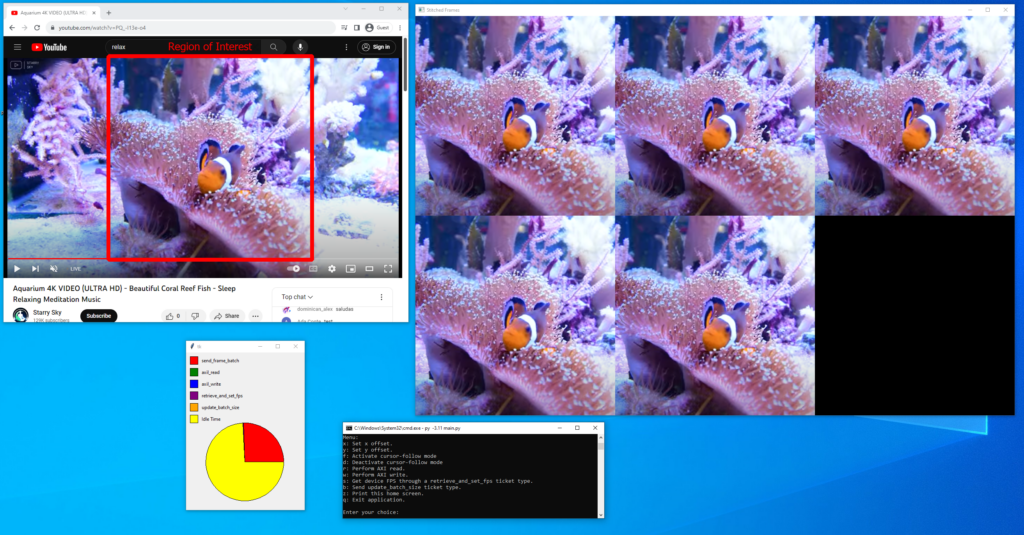
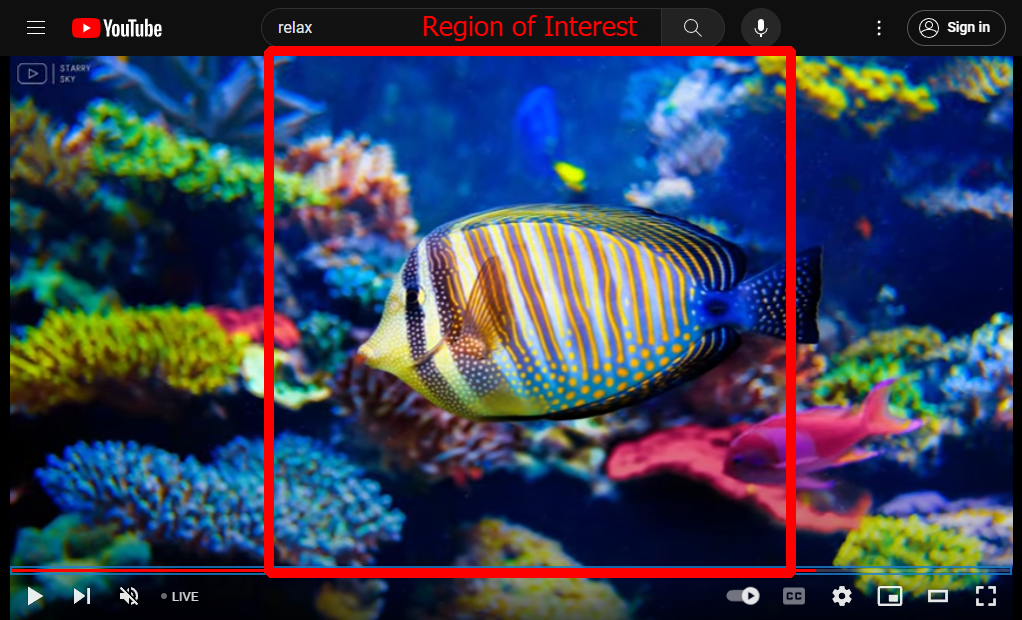
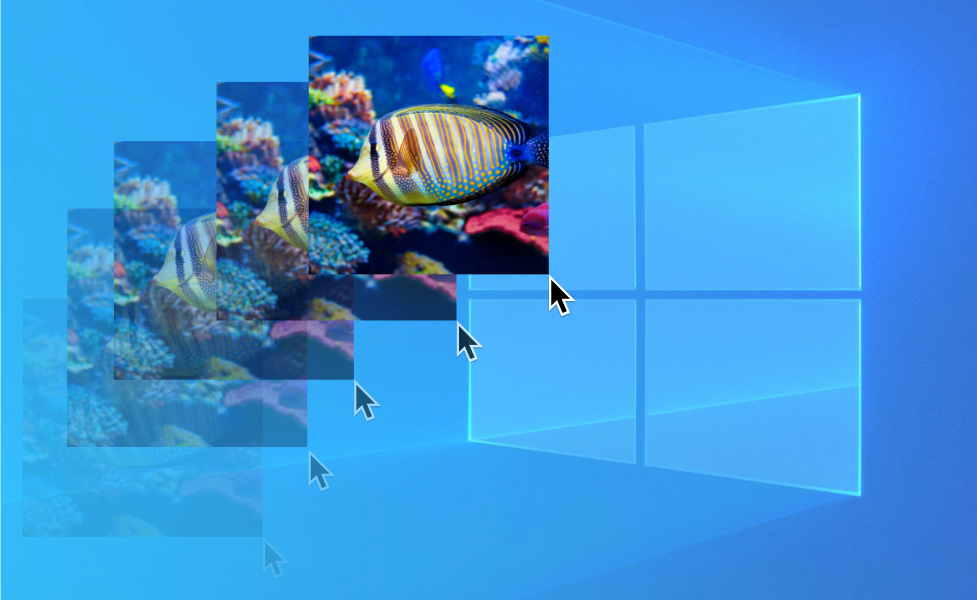
The screenshot at the top of this page shows the example application running on the primary display. The ROI is bordered in red. You can move any window of interest into this area. In our example, we have used a YouTube video.
The application continually captures frames from the region of interest and passes them to the FPGA using FrontPanel Pipe transactions. The FPGA video pipeline overlays these images onto the secondary display’s video stream.
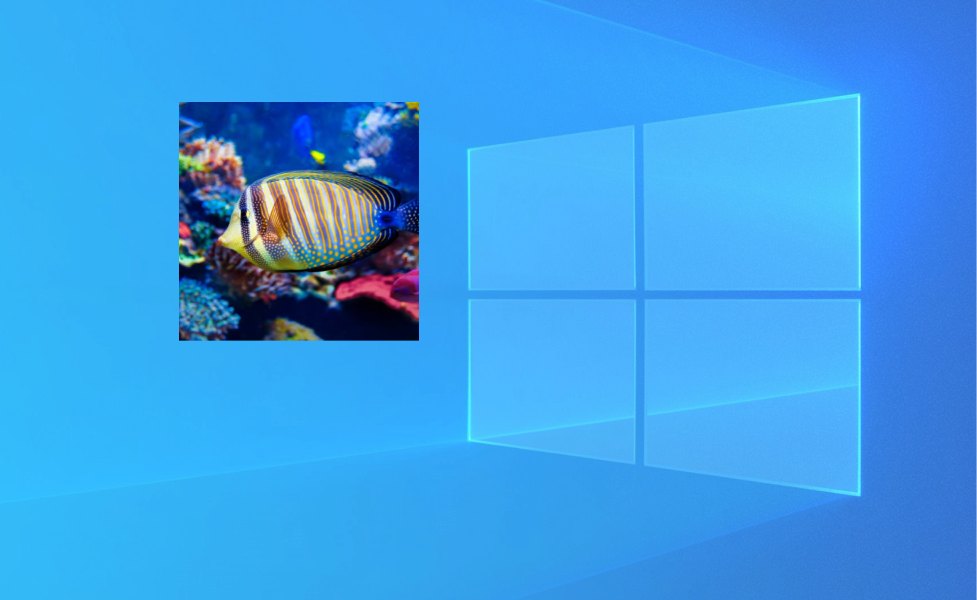
The screenshot below shows the secondary display. The background is the image sent from the PC. The overlay is what is captured from the primary display ROI and added to the image in the video pipeline.
Cursor Follow Mode
You may optionally enable cursor follow mode. When this mode is enabled, the example application will continually capture the X,Y coordinates of the mouse cursor and pass them along to the FPGA using AXI-Lite commands through the FrontPanel API. The system will then direct the video pipeline to place the overlay at the corresponding location on the secondary display. This is depicted in the screenshot below.
Getting Started Tutorial
Requirements
- Windows 10/11
Notice: Our application supports Windows 10/11 because it uses a compiled form of the Desktop Duplication API in Python. If needed, change the screen capture method for other OS APIs. Be cautious; some cross-platform libraries may not perform as well as OS specific APIs. - Latest DisplayPortExdes-vX.Y release files:
- dpex8320_wrapper_vX.Y.xsa
- dpex8320_wrapper_vX.Y.bit
- dpex8320_wrapper_vX.Y.tcl
- dpex8320_wrapper_vX.Y.elf
- Opal Kelly’s design-resources Repository
- AMD’s XSCT Software Command-Line Tool
Note: This component is from the AMD Vitis toolkit, necessary for installing firmware on the MicroBlaze CPU and supplying the JTAG UART driver for the console interface in AMD’s DisplayPort example design. - FrontPanel SDK
- Python 3.11
- XEM8320-AU25P
- SZG-DISPLAYPORT (installed on Port E of the XEM8320)
- One DisplayPort monitor as the PC’s secondary display.

Running the Example Design
Windows Setup
- Connect the secondary DisplayPort monitor to your host PC.
- Configure the system for dual monitor output. Define your preferred settings for resolution, refresh rate, etc. on the secondary display in Windows. Once connected to the XEM8320-AU25P + SZY-DisplayPort, Windows will use these same settings.
- Disconnect the secondary DisplayPort monitor from the PC
Hardware Setup
- Turn off the XEM8320-AU25P.
- Connect the XEM8320-AU25P to the PC using a USB-C cable.
- Connect the XEM8320-AU25P’s JTAG to the PC using the appropriate cable.
- Connect a SZG-DISPLAYPORT to port E on the XEM8320-AU25P. The SZG-MNTKIT is recommended to prevent disconnection during operation.
- Connect the SINK connector of the SZG-DISPLAYPORT to your PC’s graphics card.
- Connect the SOURCE connector of the SZG-DISPLAYPORT to the DisplayPort monitor.
- Connect the XEM8320-AU25P using a 12-volt supply.
- Turn on the XEM8320-AU25P.
Run the AMD Command-Line Application
- Copy the latest DisplayPortExdes-vX.Y release files to a working directory.
- Start a command prompt within your working directory.
- Start AMD’s XSCT Software Command-Line Tool:
C:\<path to Vitis installation>\Vitis\2023.1\bin\xsct.bat - Run the example design’s XSCT TCL script:
source dpex8320_vX.Y.tcl - In the JTAG UART terminal, select ‘s’ to place the AMD DisplayPort example design in Passthrough mode.
Run the Opal Kelly Command-Line Application
- Clone Opal Kelly’s design-resources Repository
cdto the Python application’s directory at:design-resources/ExampleProjects/DisplayPort/XEM8320/python_app- Create a virtual environment to install the tested libraries:
python -m venv venv_dpexdes./venv_dpexdes/Scripts/activate - Install the required Python libraries:
pip install -r requirements.txt - Place into the same directory the required non-pip Python libraries as outlined in
non_pip_modules_infoat:design-resources/ExampleProjects/DisplayPort/XEM8320/python_app/imports.py - Run the Python application:
py main.py - Close the Python virtual environment when finished:
deactivate
Building the Gateware
This guide demonstrates how to generate the DisplayPort example design using the Vivado IPI Block Designer.
Requirements
- Vivado
Notice: Our supported version is v2023.1. Versions outside of this are not guaranteed to be maintained. - LogiCORE, DisplayPort, Evaluation License from AMD’s Product Licensing Site.
- Vivado IP Cores’ Distribution v1.0.4 or later
- XEM8320-AU25P Board file v1.2 or later
- Opal Kelly’s design-resources Repository
Building the Gateware
- Opal Kelly’s design-resources Repository
cdto the gateware directory at:design-resources/ExampleProjects/DisplayPort/XEM8320/gateware- Set
fpdirvariable to the path of the FrontPanel Subsystem Vivado IP Core (at least version 1.0 Rev 4):set fpdir {path} - Run:
source vivado_proj_builder.tcl - Generate the Bitstream
Building the Firmware
This guide demonstrates how to build the firmware for the DisplayPort example design using Vitis.
Requirements
- AMD’s Vitis
Notice: Our supported version is v2023.1. Versions outside of this are not guaranteed to be maintained. - Opal Kelly’s design-resources Repository
- AMD’s embeddedsw Repository
- Latest DisplayPortExdes-vX.Y release files
Building the Firmware
- Obtain or Generate the
dpex8320_vX.Y.xsaFile:- You can use our provided
dpex8320_vX.Y.xsafrom our latest DisplayPortExdes-vX.Y release files. - Alternatively, you can generate this file yourself. First, complete the “Building the Gateware” how-to. Then, in Vivado, go to
File -> Export -> Export Hardwareto export the hardware design.
- You can use our provided
- In Vitis, create a new Platform Project either using our
dpex8320_vX.Y.xsa, or the.xsayou generated in the previous step. - In Vitis, create a new Application Project that targets the Platform specified above. During this process, select the Empty Application(C) template.
- Clone Opal Kelly’s design-resources Repository
Note: Use the commit associated with our latest DisplayPort example design release, available at: Opal Kelly Design Resources Releases - Clone AMD’s embeddedsw repository.
Note: For optimal results, we recommend utilizing the most recent commit of AMD’s DisplayPort example design, as it includes the latest fixes and enhancements. However, if you experience difficulties while integrating our patch with the latest commit of AMD’sembeddedsw, please consult the “Tested against commit” in our patch’s git message. This is the particular commit from AMD’sembeddedswrepository that we have verified and tested with. - Apply our custom patch to AMD’s
embeddedswrepository.- Navigate to the
embeddedswdirectory.
Command:cd path/to/embeddedsw - Apply the patch from Opal Kelly’s
design-resourcesrepository.
Command:git am /path/to/design-resources/ExampleProjects/DisplayPort/XEM8320/embedded_c/AMD-KCU105-DP14-Ported-for-OK-XEM8320.patch - Note: Replace
path/to/...with the actual paths to the cloned repositories on your system.
- Navigate to the
- Import the updated files from the patched directory into your Vitis project:
embeddedsw/XilinxProcessorIPLib/drivers/dp14txss/examples/src/kcu_dp14/ - Also import
frontpanel.c,frontpanel.h, andlscript.ldinto your Vitis project, overwritinglscript.ldwhen prompted, from:design-resources/ExampleProjects/DisplayPort/XEM8320/embedded_c/ - Build the project.
Run AMD’s Application within Vitis
Once you’ve built the firmware within Vitis, there’s no need to follow the quick setup instructions presented in the Getting Started guide to run your built sources. Instead:
- In Vitis, click Run.
- In the JTAG UART terminal, select ‘s’ to place the AMD DisplayPort example design in Passthrough mode.”
Gateware Architecture Reference
The design captures a video feed from DisplayPort, usually sourced from a PC graphics card, and saves the video frames into DDR4 memory. At the same time, a USB3 FrontPanel inputs an additional video stream, which is also stored in the DDR4 memory. Later, these frames are retrieved, with the video from FrontPanel overlaid onto the DisplayPort feed, and then displayed on a monitor through DisplayPort.
In this architecture:
- The “FrontPanel Pipe To AXI-Stream Video Controller” block uses the FrontPanel block pipe to implement the AMD AXI-Stream Video specification.
- The FrontPanel To AXI-Lite Controller block converts FrontPanel signals to AXI-Lite. This controller is essential for manipulating various elements in the video system. A significant component it controls is the video mixer, which permits adjustments to the X and Y coordinates of the FrontPanel Video feed overlay.
Python Application Menu Reference
The Python application offers a diverse set of functions through a user-friendly menu interface. Each menu item corresponds to a specific operation, allowing the user to interact with the application effectively. Below is a breakdown of each menu option:
Menu:
x: Set x offset.
y: Set y offset.
f: Activate cursor-follow mode
d: Deactivate cursor-follow mode
r: Perform AXI read.
w: Perform AXI write.
s: Calculate DisplayPort feed's FPS.
B: Update system's batch size.
z: Print this home screen.
q: Exit application.

Enter your choice:Code language: PHP (php)- x: Set x offset.
Users can adjust the ‘x’ offset for the FrontPanel Video’s position when overlaid on the DisplayPort feed. Setting X=0 aligns the video to the left edge of the screen. - y: Set y offset.
This allows users to modify the ‘y’ offset of the FrontPanel Video relative to the DisplayPort feed. When Y=0, it aligns with the screen’s top edge. - f: Activate cursor-follow mode.
Selecting this initiates a mode where the FrontPanel Video’s position continuously updates, making it follow the cursor’s movements. This effectively changes the X and Y values in real-time based on cursor position. - d: Deactivate cursor-follow mode.
This option deactivates the continuous tracking of the cursor. - r: Perform AXI read.
This option initiates an AXI-Lite read command into the AXI interconnect system within the Gateware. It allows access to all video components in the system for monitoring purposes. - w: Perform AXI write.
This command executes an AXI-Lite write operation into the AXI interconnect system inside the Gateware. It allows users to configure and adjust the various video components within the system. - s: Calculate DisplayPort feed’s FPS
Retrieves information related to the DisplayPort feed’s main stream attributes (MSA), and subsequently calculates the DisplayPort feed’s frames per second (FPS). - b: Update system’s batch size.
Sets the quantity of frames grouped together for every transfer. - z: Print this home screen.
Choosing this will reprint the main application menu, aiding users in case they need a refresher on the available commands. - q: Exit application.
This command sends signals to the various threads in the system to close, ensuring a safe exit from the application.
Python Application Architecture Reference
The application utilizes a multithreaded architecture, centralizing around a “work ticketing” system for the DeviceThread. This thread exclusively manages the XEM8320-AU25P device. Threads from anywhere in the system can submit work tickets, detailing tasks and their respective priorities. The DeviceThread prioritizes and processes these tasks, starting with the highest priority. The system’s ticket types and threads are outlined below.
Ticket Types
- send_frame_batch:
This ticket type is designed to handle the transfer of a buffer of data, filled according to the user-determined batch size, which signifies the quantity of frames grouped for each transfer. Its primary role is to ensure the complete transfer of these grouped frames to the gateware. - axil_read:
This ticket serves as a wrapper for the FrontPanel to AXI-Lite controller’s axil_read method. It facilitates the reading of data from the AXI-Lite interconnect in the gateware. - axil_write:
Analogous to the axil_read ticket, the axil_write ticket encapsulates the FrontPanel to AXI-Lite controller’s axil_write method. It provides the means for writing data to the AXI-Lite interconnect in the gateware. - retrieve_and_set_fps:
Retrieves information related to the DisplayPort feed’s main stream attributes (MSA), and subsequently calculates the DisplayPort feed’s frames per second (FPS). If there is a change from the Python application’s FPS system variable, then we update it. - update_batch_size:
It prompts an interrupt to the MicroBlaze, which then resets the DDR4 frame pointers for the FrontPanel video feed and adjusts its internal pointer arithmetic logic for the new batch size.
Threads
main thread
├─ DeviceThread
│  ├─ CaptureFramesThread
│  │  ├─ DisplayThread
│  │  └─ [Sends batched frame data to DeviceThread & DisplayThread]
│  ├─ PieChartThread
│  └─ UpdateStatsThread
│     └─ [Sends statistics to PieChartThread & StatusWindow thread]
├─ CursorFollowThread (Spawned conditionally)
└─ StatusWindow thread (Global scope for status display)Code language: CSS (css)- main thread: Starts the system and initiates the DeviceThread.
- DeviceThread: Manages the ticketing system to the XEM8320-AU25P device and initiates several child threads.
- CaptureFramesThread: Responsible for screenshot gathering, cropping, and batching frames at the system’s frame rate.
- DisplayThread: Visualizes the batched frame data.
- UpdateStatsThread: Offloads statistics logic from ticketing system run loop, for efficiency.
- PieChartThread: Visualizes the statistics.
- StatusWindow thread: A global utility for displaying various status info.
- CursorFollowThread: Activated in a specific mode, captures mouse/cursor coordinates and issues tickets to update gateware X and Y parameters via AXI Lite commands.
Widget Reference
Pie Chart

The DeviceThread handles ticket processing and monitors the execution duration for each ticket type, accumulating the total execution time. Every second, these statistics are fetched, reset, and depicted in a pie chart, providing a visual representation of the ticket processing efficiency.
Batch Frame Visualizer
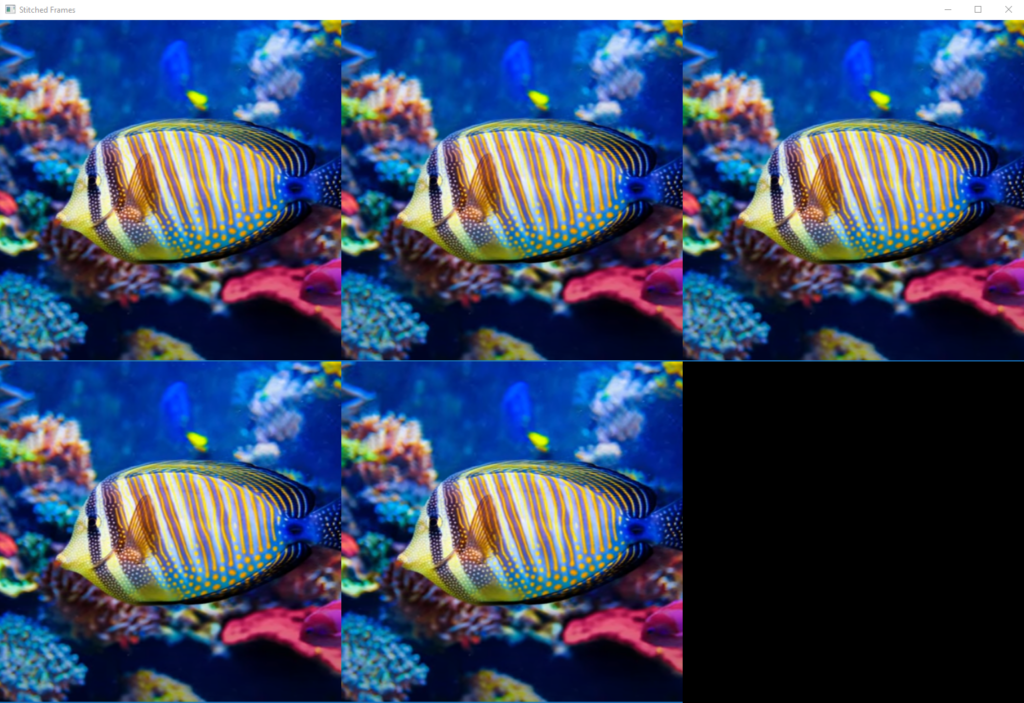
For optimal performance, the system encourages larger transfer batches. The Batch Frame Visualizer displays the quantity of frames grouped together for every transfer determined by the user-specified batch size. It provides a visual representation of frame batches, emphasizing the importance of bulk transfers.
System Status
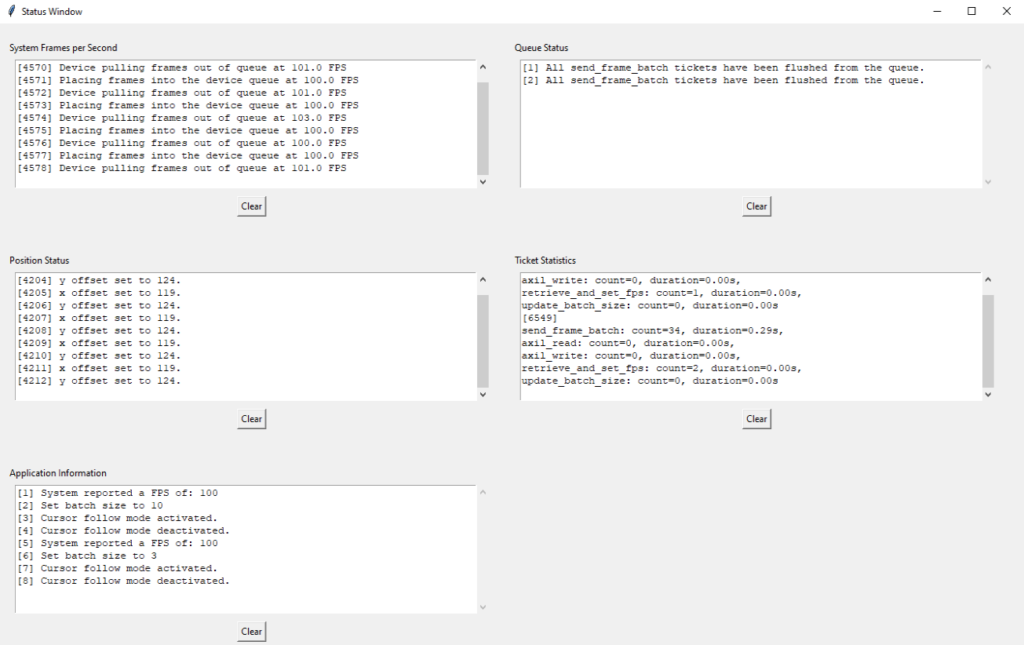
The StatusWindow thread facilitates status updates segmented into five distinct categories:
- System Frames per Second: This displays insights into the rate at which frames are fed into and drawn out of the DeviceThread’s ticketing system. It offers a direct measure of the system’s frame processing speed.
- Position Status: All adjustments to the position of the FrontPanel video feed are reported in this section, ensuring real-time tracking of the video’s placement.
- Application Information: This segment provides feedback about the menu application’s responses, making it a hub for basic application-related notifications.
- Queue Status: Delve into the mechanics of the DeviceThread’s ticketing system. Here, you’ll find data on ticket management, such as instances when ticket types are discarded (often when the application’s frame rate surpasses the device’s transfer capability) or when the ticket queue undergoes a flush due to batch size modifications.
- Ticket Statistics: A detailed breakdown of ticket processing in the DeviceThread. Similar to the Pie Chart, it captures the execution duration for each ticket type and keeps a running total. Instead of a visual representation, this section enumerates the data, providing a textual snapshot of the ticket processing metrics.
Troubleshooting
To effectively address your issues, first identify whether they stem from AMD’s base design or Opal Kelly’s enhancements. Reach out to the appropriate party based on the issue’s source.
- AMD’s Base Design: Handles the primary DisplayPort video passthrough. For troubleshooting, refer to AMD’s Debugging Guide.
- Opal Kelly’s Enhancements: Provides the USB3 FrontPanel communication link, introducing a secondary video stream. It’s important to note that our enhancements are provided AS-IS and are not guaranteed to be maintained. This means that Opal Kelly does not officially support this asset, and it should be considered self-supported. As a result, we do not offer official technical support for issues that may arise from their use. Furthermore, we cannot assure its compatibility with all systems or guarantee its long-term functionality. Users utilizing these enhancements should be prepared to address challenges on their own or seek assistance through our community forums.
Resources
design-resources Repository: DisplayPort Example Design Source Code
This repository includes the Python Frontend application code, the MicroBlaze embedded C firmware, and the gateware.