User Interface Event Handling
In this tutorial you will build a simple FrontPanel Alloy application that functions in a similar manner as the one in the ‘Application Development’ tutorial. The difference will be that this application will use components from the set of primitive React components to handle user interactions.
Install Prerequisites
- Node.js – Download | Node.js (nodejs.org)
- Node Package Manager – Downloading and installing Node.js and npm | npm Docs (npmjs.com)
- Source Code Editor
- FrontPanel Application version 6.0.0 or greater
- Counters Sample bitfile for your device – Opal Kelly Pins
Create the React Application
Set the current directory to the ‘Workspace’ directory created in the ‘Application Development’ tutorial.
cd WorkspaceCreate a React application in the workspace directory using the Typescript template.
npx create-react-app event-handling-reactapp --template typescriptThis command should create a new project directory named ‘event-handling-reactapp’.
Set the current directory to ‘event-handling-reactapp’ and build the template React application.
cd event-handling-reactapp
npm run build
Verify that the application builds successfully.
Install the FrontPanel Alloy React components package
npm install @opalkelly/frontpanel-react-componentsCode language: CSS (css)This step will update the package.json file in your project to add a dependency to the latest version of the FrontPanel React components package. It will also download and install the contents of the package to allow importing the modules provided by the library.
Add the FrontPanel React Component
Add a new file named FrontPanel.tsx to the src directory and add the following:
import React, { Component } from "react";

import {
    IFrontPanel,
    WorkQueue,
    FrontPanelPeriodicUpdateTimer,
    IEventSubscription
} from "@opalkelly/frontpanel-alloy-core";

import {
    EndpointAddressProps,
    Button,
    NumberDisplay,
    NumeralSystem
} from "@opalkelly/frontpanel-react-components";

import "./FrontPanel.css";

export interface FrontPanelProps {
    name: string;
}

export interface FrontPanelState {
    device: IFrontPanel;
    updateTimer: FrontPanelPeriodicUpdateTimer;
    counterValue: bigint;
}

class FrontPanel extends Component<FrontPanelProps, FrontPanelState> {

    private readonly _WorkQueue: WorkQueue = new WorkQueue();

    private readonly _Counter1: EndpointAddressProps = {epAddress: 0x20, bitOffset: 0};
    private readonly _Counter1Reset: EndpointAddressProps = {epAddress: 0x00, bitOffset: 0};

    private _WireUpdateEventSubscription: IEventSubscription | null = null;

    constructor(props: FrontPanelProps) {
        super(props);

        this.state = {
            device: window.FrontPanel,
            updateTimer: new FrontPanelPeriodicUpdateTimer(window.FrontPanel, 10),
            counterValue: BigInt(0)
        };
    }

    componentDidMount() {
        this.OnUpdateCounterValue();

        this._WireUpdateEventSubscription = this.state.updateTimer.WireOutValuesChangedEvent.SubscribeAsync(this.OnUpdateCounterValue.bind(this));

        this.state.updateTimer.Start();
    }

    componentWillUnmount() {
        if (this._WireUpdateEventSubscription) {
            this._WireUpdateEventSubscription.Cancel();
        }

        this.state.updateTimer.Stop();
    }

    render() {
        return (
            <div className="ControlPanel">
                <NumberDisplay
                    label={{text: "Counter #1", horizontalPosition: "right", verticalPosition: "top"}}
                    tooltip="Counter #1"
                    value={this.state.counterValue}
                    maximumValue={BigInt(0xff)}
                    minimumValue={BigInt(0)}
                    numeralSystem={NumeralSystem.Decimal}
                    />
                <Button
                    label="Reset"
                    tooltip="Reset Counter #1"
                    onButtonDown={this.OnResetButtonDown.bind(this)}
                    onButtonUp={this.OnResetButtonUp.bind(this)}
                    />
            </div>
        );
    }

    // Event Handlers
    private async OnUpdateCounterValue() {
        const wireValue = await this.state.device.getWireOutValue(this._Counter1.epAddress);
        const counterValue = BigInt((wireValue >> this._Counter1.bitOffset) & 0xff);
        this.setState({counterValue: counterValue});
    }

    private OnResetButtonDown() {
        console.log("ResetButton => Down");
        this._WorkQueue.Post(async () => {
            await this.state.device.setWireInValue(this._Counter1Reset.epAddress, 0xffffffff, 1 << this._Counter1Reset.bitOffset);
            await this.state.device.updateWireIns();
        });
    }

    private OnResetButtonUp() {
        console.log("ResetButton => Up");
        this._WorkQueue.Post(async () => {
            await this.state.device.setWireInValue(this._Counter1Reset.epAddress, 0x0, 1 << this._Counter1Reset.bitOffset);
            await this.state.device.updateWireIns();
        });
    }
}

export default FrontPanelCode language: JavaScript (javascript)
This defines a React Component named FrontPanel whose state resembles the one that was created in the ‘Application Development’ tutorial. The difference here is that an additional variable called counterValue has been added to the state. This variable will be updated when the periodic update timer calls the OnUpdateCounterValue event hander after it has updated WireOut values. Another difference is the addition of three event handler methods OnUpdateCounterValue, OnResetButtonDown, and OnResetButtonUp.
Add the Style Sheet
Add a new file named FrontPanel.css to the src directory and add the following:
.ControlPanel {
    display: flex;
    flex-direction: column;
    color: black;
    background-color: white;
    border-radius: 8px;
    padding: 10px;
    gap: 8px;
    margin: 10px;
  }Code language: CSS (css)
This defines the style to apply to the <div> element that contains the NumberDisplay and the Button so that the components will layout in a column with some space around them.
Update the App Component
Open the App.tsx file and edit it to look like the following:
import React from "react";

import "./App.css";

import FrontPanel from "./FrontPanel";

import { Application } from "@opalkelly/frontpanel-react-components";

function App() {
    return (
        <div className="App">
            <Application>
                <FrontPanel name="Sample" />
            </Application>
        </div>
    );
}

export default App;Code language: JavaScript (javascript)
This will cause the application to display the FrontPanel component that was created in the previous steps.
Open the App.css file and edit it to look like the following:
.App {
  text-align: center;
  background-color: #282c34;
  min-height: 100vh;
  display: flex;
  flex-direction: column;
  align-items: center;
  justify-content: center;
  color: white;
}Code language: CSS (css)
Build the Application
Run the following command in the terminal:
npm run buildRun the Application
Using the FrontPanel application with an XEM device connected via USB, load the ‘counters.bit’ file and then load the ‘FrontPanel Profile’.
The application should run, and it should work in the same manner as it did in the ‘Application Development’ tutorial. The current value of counter #1 should display and clicking the Reset button should result in restarting the counter at the value zero.
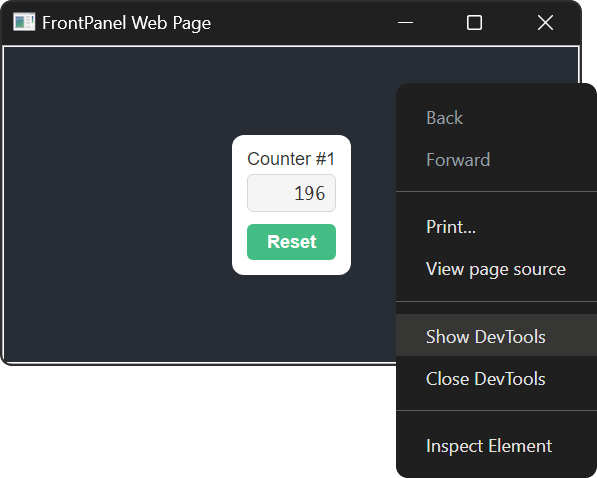
Open the Chrome DevTools
Perform a right click somewhere in the application window to display the context menu. It should display ‘Show DevTools’ as one of the options. Click this option to open the Chrome DevTools window.
Inspect the Console log
In the Chrome DevTools window select the ‘console’ tab.
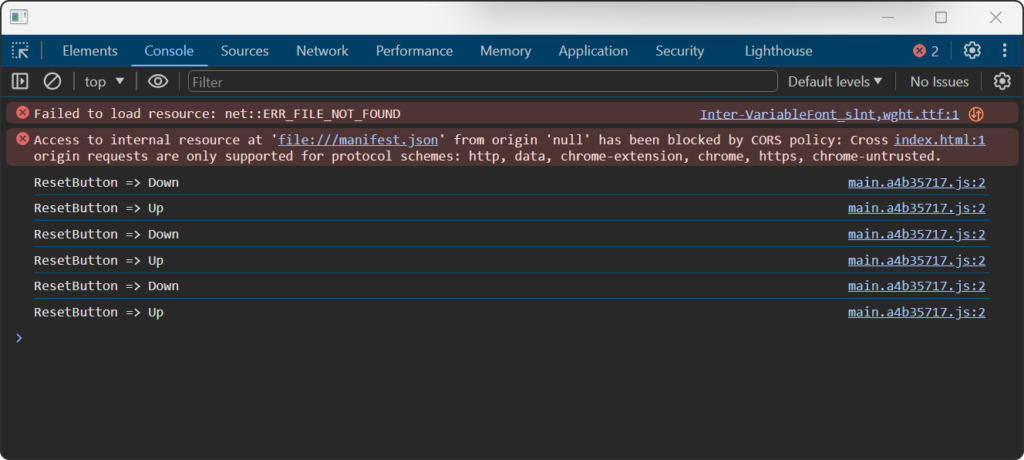
Verify that a message is added to the log each time the Reset button is clicked. The console is useful for tracking down the source of problems with the user interface. Sometimes a button is clicked, and nothing happens. By adding a log message to the console, you can quickly determine if the event handler is being called in response to the user interaction.